GBP/USD – Bearish Continuation After CHoCH(read caption)GBP/USD – Bearish Continuation After CHoCH
The market structure on GBP/USD is showing a clear shift in momentum, with price transitioning from bullish to bearish after a confirmed CHoCH (Change of Character).
🔍 Market Structure
A clean CHoCH confirms the break in previous bullish structure.
Price is now forming lower highs and lower lows, signaling bearish control.
The current move looks like a pullback into resistance, not strength.
🧱 Key Levels
Major Resistance: 1.3373
Mid Resistance: 1.3285
Current Price: ~1.3232
Target / Support: 1.3153
📉 Bearish Scenario (Primary)
Price retraces into the 1.3285 – 1.3373 resistance zone.
Rejection here confirms continuation.
Downside targets:
First: 1.3153
Potential extension if momentum increases.
⚠️ Bullish Invalidation
A strong breakout and hold above 1.3373 would invalidate the bearish bias.
This would suggest a deeper reversal rather than continuation.
💡 Trade Idea
Watch for bearish confirmation at resistance (rejection wicks, engulfing candles).
Aggressive entries: near 1.3285 resistance.
Conservative entries: after break and retest of 1.3153.
🧠 Confluence Factors
CHoCH + trendline break
Lower high formation
Resistance alignment
News volatility (USD events) acting as catalyst
📌 Summary:
Bias remains bearish below 1.3373. The setup favors a pullback → rejection → continuation lower toward 1.3150.
Gbpnzdanalysis

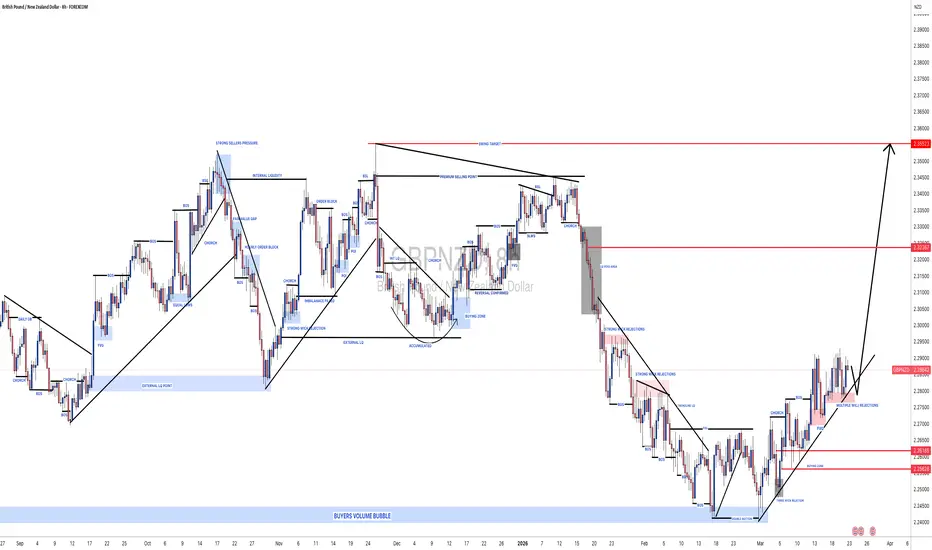
#GBPNZD: Two Targets, Once Strong Bullish Entry! ✴️ The GBP/NZD pair demonstrated a favourable reversal upon reaching our designated buying zone at 2.256, currently trading at 2.287. This indicates potential for continued upward momentum. We anticipate the price may advance towards the 2.32 level where a liquidity void is expected to be addressed. The British Pound is projected to maintain its strength against the New Zealand Dollar with expectations of a robust bullish continuation extending to 2.35.
✴️ Our strategic targets are established at 2.32 for the initial objective and 2.35 for the secondary objective. The successful execution of these trades is contingent upon strong fundamental support. We recommend closely monitoring price action on Monday to inform subsequent trading decisions. Adherence to stringent risk management protocols is advised.
We wish you successful and secure trading.
Sincerely,
Team Setupsfx 🧠❤️
Eliana | GBPUSD · 1H – Triangle Compression SetupFPMARKETS:GBPUSD
After the strong sell-off earlier in the structure, price entered a consolidation phase and began forming higher lows along the ascending trendline. However, the descending resistance continues to cap bullish momentum, creating a triangle formation. Price recently reacted from the supply zone near 1.34 and is now moving lower toward the demand zone around 1.3260–1.3300. If sellers maintain control, the market may sweep the sell-side liquidity below the range before a potential reaction occurs.
Key Scenarios
❌ Bearish Case 📉
Supply zone rejection continues.
🎯 Target 1: 1.3300
🎯 Target 2: 1.3260
🎯 Target 3: 1.3250 liquidity
✅ Bullish Case 🚀
Break above supply zone.
🎯 Target 1: 1.3450
🎯 Target 2: 1.3500
Current Levels to Watch
Resistance 🔴: 1.3400 – 1.3420
Major Resistance 🔴: 1.3500
Support 🟢: 1.3300
Major Support 🟢: 1.3260 – 1.3250
⚠️ Disclaimer: This analysis is for educational purposes only. It is not financial advice.

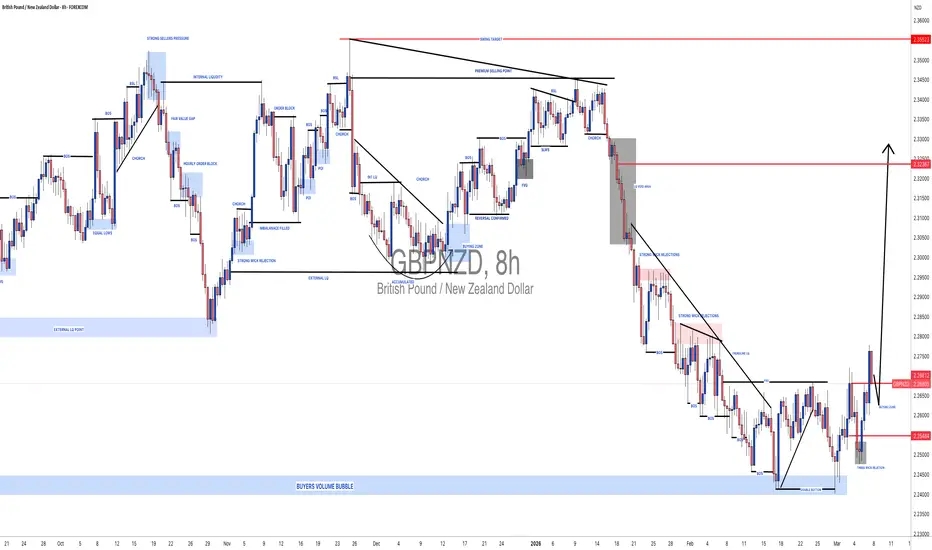
#GBPNZD: Bulls In Strong Control! +360 Pips Since Our Last Entry🔺In our previous GBPNZD trading setup, we identified a key level where a strong bullish reversal was expected. Today’s price action confirms this prediction. We anticipate a surge in bullish volume in the coming days.
🔺There are two targets. The first is reached when the price fills the void area and the second is above that level.
🔺Always use accurate risk management and place stop losses when trading.
Good luck and trade safely!
Team Setupsfx_
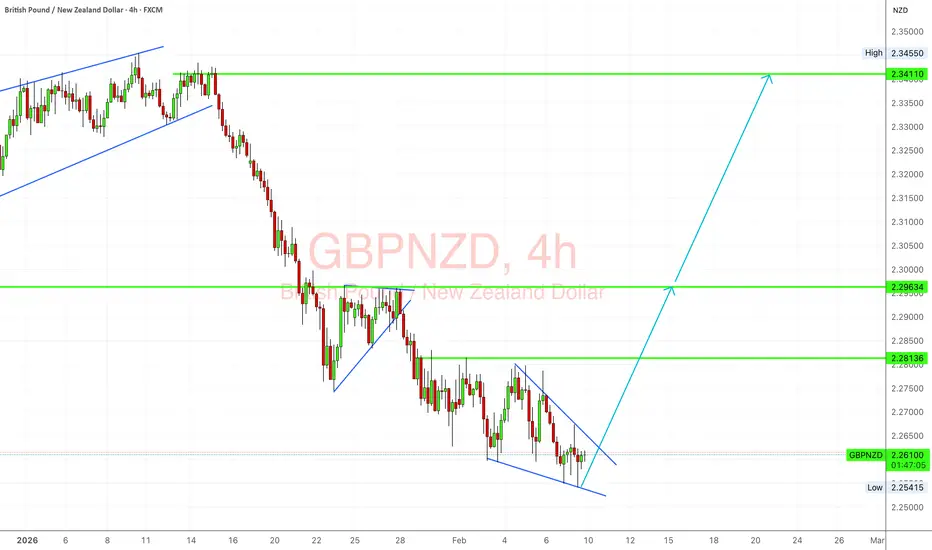
GBP/NZD Macro + Technical Alignment Signals Bullish Bias📊 GBP/NZD – “The Ninja” | Bullish Breakout Strategy & Liquidity Path
Asset: GBP/NZD – British Pound vs New Zealand Dollar
Market: Forex
Trading Style: Day / Swing Trade Opportunity
📈 Trade Plan – Bullish Breakout Setup
The GBP/NZD “Ninja” cross is showing a potential bullish continuation after a moving average breakout confirmation, signaling that market structure may be shifting toward buyers.
This setup suggests that institutional momentum is building after a technical breakout, which often leads to continuation toward liquidity pools above.
Trade Bias: 🟢 Bullish
Entry Zone: Flexible entry – traders may scale positions around current market levels after confirmation.
Target: 🎯 2.29000
Stop Loss: 🛑 2.25000
📌 Technical Logic Behind the Setup
Moving Average breakout confirmation
Market attempting trend continuation
Potential liquidity sweep and momentum expansion
Overbought zones approaching near resistance levels
Institutional traders may push price into liquidity pockets near 2.29
⚠️ As price approaches resistance, expect profit-taking, volatility spikes, and possible traps before continuation.
🌍 Fundamental Drivers Behind GBP/NZD
🇬🇧 British Pound (GBP)
Key macro factors influencing the Pound:
• The UK economy is projected to grow around 1.1% in 2026, reflecting slower but stable expansion.
• Markets are watching Bank of England interest-rate decisions, as signals of possible rate cuts could impact GBP strength.
• Inflation is expected to remain around 2.3% in 2026, keeping monetary policy cautious.
• Global geopolitical tensions affecting energy markets may create volatility in GBP.
💡 If UK economic data surprises positively (PMI, employment, inflation), GBP strength could accelerate this bullish move.
🇳🇿 New Zealand Dollar (NZD)
• New Zealand inflation recently remained around 3%, keeping monetary policy relatively tight.
• Strong inflation data has previously supported the NZD.
• However, slowing housing activity and global uncertainty can weaken the Kiwi.
💡 Because NZD is a risk-sensitive currency, shifts in global risk sentiment can move GBP/NZD quickly.
📊 Correlated Pairs to Watch
These markets often move with or influence GBP/NZD momentum:
GBP Strength Indicators
💷 OANDA:GBPUSD – Pound vs US Dollar
💷 OANDA:GBPAUD – Pound vs Australian Dollar
💷 OANDA:GBPCAD – Pound vs Canadian Dollar
If these pairs are rising simultaneously, GBP strength may support this bullish GBP/NZD setup.
NZD Strength Indicators
🥝 OANDA:NZDUSD – Kiwi vs US Dollar
🥝 OANDA:AUDNZD – Aussie vs Kiwi
🥝 OANDA:EURNZD – Euro vs Kiwi
If NZD strengthens across the board, it may slow GBP/NZD upside momentum.
🧠 Smart Money Perspective
Institutional traders often operate with the following cycle:
Liquidity → Manipulation → Expansion
This setup may represent the expansion phase after a structural breakout, where price seeks higher liquidity zones.
Watch for:
✔ Momentum continuation
✔ Pullbacks into moving averages
✔ Liquidity sweeps before impulsive moves
⚠️ Risk Management Note
Dear traders,
This analysis is not financial advice.
Take profit and stop loss levels are personal trading decisions.
Always manage risk according to your own strategy and capital protection rules.
The market rewards discipline, patience, and risk control.
🏴☠️ Thief Trader Mindset
💬 “The market hides liquidity like treasure — the patient trader finds it.”
💬 “Trade the structure, respect the risk, and let the market pay you.”
💬 “Retail traders chase price. Professionals wait for liquidity.”
⭐ If you found this analysis helpful:
✔ Boost 🚀
✔ Like ❤️
✔ Follow for more Forex, Crypto, and Institutional-style trade ideas
Trade smart.
Trade disciplined.
Catch the liquidity before the crowd does.
— Thief Trader 🏴☠️

GBP/USD H4 Market Structure Analysis📊 GBP/USD H4 Market Structure Analysis
🧭 1. Overall Market Structure
The chart shows a clear bearish market structure on the H4 timeframe.
Key characteristics:
📉 Lower Highs (LH)
📉 Lower Lows (LL)
🔽 Price moving inside a descending channel
After reaching the major supply zone around 1.3850–1.3880, price started a strong bearish move and continued forming a structured downward trend.
👉 This confirms bearish momentum controlled by sellers.
🏗️ 2. Descending Channel Structure
Price has been respecting a descending parallel channel, which indicates an organized bearish trend.
Upper Boundary (Dynamic Resistance)
Multiple rejections from this level
Sellers enter aggressively
Lower Boundary (Dynamic Support)
Price repeatedly reacts here
Buyers temporarily defend this zone
📌 This structure often leads to either a breakout or a corrective move toward the upper channel.
🟦 3. Key Liquidity Zones
🔴 Major Supply Zone
1.3850 – 1.3880
Reasons this level is important:
Strong rejection occurred here
Start of the bearish trend
Institutional selling likely initiated
🟢 Major Demand Zone
1.3240 – 1.3260
Reasons this level is important:
Price recently reacted strongly
Sell-side liquidity was taken
Buyers stepped in
This area acts as a temporary support zone.
⚡ 4. Current Price Behavior
Current price is around 1.3400.
Market conditions:
Sideways consolidation
Bearish momentum slowing
Possible accumulation phase
This suggests the market could prepare for a corrective move upward.
🔄 5. Most Probable Market Scenario
🪤 Step 1 — Liquidity Test
Price may revisit 1.3300 – 1.3280 to collect liquidity.
🚀 Step 2 — Bullish Retracement
After liquidity is taken, price may push upward.
🎯 Step 3 — Target Zones
Potential upside targets:
1️⃣ 1.3500 – 1.3550 (mid-channel resistance)
2️⃣ 1.3650 – 1.3700 (upper channel resistance)
This would be a retracement within the bearish trend.
📈 6. Bullish Confirmation Signals
Traders should look for:
✔️ Break of a recent lower high
✔️ Bullish engulfing candles on H4
✔️ Strong rejection from 1.3250 support
✔️ Break above 1.3430–1.3450
These signals would confirm buyer strength.
📉 7. Bearish Continuation Scenario
If the support zone fails:
Break below 1.3240
Bearish continuation likely
Next downside targets:
🎯 1.3180
🎯 1.3100
This would confirm trend continuation.
🧠 Professional Trading Insight
The chart reflects a classic trend-channel structure where price cycles between support and resistance.
Current phase appears to be:
Liquidity → Consolidation → Possible Retracement
✅ Short-Term Bias: Bullish retracement
📉 Overall Trend: Bearish
🎯 Resistance Levels: 1.3500 – 1.3650
🛑 Support Level: 1.3250

GBPNZD Testing Deep Support as Reversal Pressure Starts to BuildGBPNZD has been in a steady, grinding decline, and the structure on the 4H chart shows a clean sequence of lower highs and lower lows. What stands out now is location: price is pressing into a well-defined support zone after a corrective channel breakdown. When a pair stretches this far in one direction while approaching higher-timeframe demand, I stop chasing and start asking whether the next move is exhaustion or continuation. The setup here is less about momentum and more about reaction at levels.
Current Bias
Short term: Bearish, but stretched — leaning toward corrective bounce risk.
Medium term: Still structurally bearish unless price reclaims the 2.28–2.30 resistance band.
Key Fundamental Drivers
GBP side: Bank of England remains cautious, with growth soft and structural drag themes still present in UK outlook discussions. Rate expectations are not aggressively rising, which limits strong GBP upside.
NZD side: NZD is sensitive to global risk sentiment and China-linked growth signals. When risk tone stabilizes, NZD tends to hold better than GBP.
Rate differential theme: Relative policy expectations between BoE and RBNZ are not widening sharply, which reduces strong trend fuel and supports more range or rotation behavior after extended moves.
Risk appetite: NZD benefits more than GBP in mild risk-on flows, reinforcing the recent downside in GBPNZD.
Macro Context
Interest rate expectations: Major central banks remain data dependent. Markets are reacting heavily to labor and inflation data rather than forward guidance alone. That keeps rate spread trades unstable.
Growth trends: UK growth signals remain uneven, while NZ is tied closely to external demand and commodity-linked flows.
Commodity flows: Stable to firm commodity tone tends to support NZD relative to GBP.
Geopolitical themes: Trade policy noise, sanctions chatter, and tariff discussions globally keep FX volatility elevated and favor selective risk currencies over slower-growth currencies like GBP at times.
Primary Risk to the Trend
The main risk to continued downside is risk sentiment flipping positive while USD and yields soften, which typically lifts NZD broadly — but if GBP catches a relative bid on UK data or BoE repricing, GBPNZD can snap back sharply from support. This pair is known for violent mean-reversion rallies after extended drops.
Most Critical Upcoming News/Event
Next high-impact UK data (inflation / growth / labor)
Any RBNZ policy signals or NZ inflation data
Major US labor or inflation releases that shift global rate expectations and risk sentiment (indirect but powerful driver for NZD crosses)
Leader/Lagger Dynamics
GBPNZD is typically a lagger pair.
It usually follows GBPUSD and NZDUSD direction rather than leading them.
Also reacts to AUDNZD and GBPAUD rotation flows.
If NZD strength shows first in NZDUSD and AUDNZD drops, GBPNZD often follows lower afterward.
If GBP starts outperforming across GBPUSD and GBPJPY, GBPNZD rebounds tend to follow.
Key Levels
Support Levels:
2.2600–2.2540 zone (current demand and recent low area)
Below that: 2.2300 area as deeper swing support if breakdown extends
Resistance Levels:
2.2815 area
2.2960 area
2.3400–2.3450 higher-timeframe supply zone
Stop Loss (SL):
Below 2.2500 for bounce setups from current support zone
Take Profit (TP):
First: 2.2815
Second: 2.2960
Extension: 2.3400 zone if broader reversal unfolds
Summary: Bias and Watchpoints
Right now GBPNZD is still bearish in structure, but it’s pressing directly into a major support zone after a prolonged slide, which raises the odds of at least a corrective bounce. Fundamentally, the pair has been driven by relatively softer GBP tone and steadier NZD risk sensitivity, but that spread is not expanding aggressively — which weakens trend continuation odds at extremes. The biggest risk to the downside trend is a shift in rate expectations or risk sentiment that boosts GBP relative to NZD and triggers a squeeze higher. I’m watching reactions around 2.26 support closely; failure there opens deeper downside, but a firm hold sets up a recovery toward 2.28 and possibly 2.30+. This is level-driven now, not chase-driven.
700-Pip Range Hiding a Bigger Move — GBPUSD Setup ExplainedSince the September 2022 low near parity — a level not seen since 1985 — OANDA:GBPUSD began an impressive recovery phase.
That bottom marked a major sentiment extreme.
From there, the pair transitioned into a clear bullish reversal, eventually climbing back toward levels the market feels more “comfortable” with — near the 1.40 handle.
Since last summer, GBPUSD has been trading inside a relatively tight range of roughly 700 pips. For a pair known for volatility, that is actually a compressed structure.
At the end of January this year, price once again approached the 1.40 resistance zone. And just like previous attempts, the market failed to break through and started to rotate lower.
Now let’s zoom out.
On the weekly chart, although price has risen significantly from parity, the structure resembles a rising wedge — typically a reversal pattern.
More importantly, the broader context suggests the pair may be transitioning into a large multi-month range. This, in fact, is a common behavior in Forex.
So the real question is:
Will GbpUsd break above 1.4 in the longer term?
In my view, there is currently no strong macro catalyst that justifies a sustained break above 1.40.
Instead, probabilities favor a broader downside rotation toward the 1.20 major support zone.
From a trading perspective, I am monitoring GBPUSD for a longer-term position:
Preferred sell area: around 1.36
Target: approximately 1500 pips lower
Stop: around 400 pips
Risk-Reward: close to 1:4

GBPNZD - Looking To Sell Pullbacks In The Short TermH4 - Strong bearish move.
No opposite signs.
Currently it looks like a pullback is happening.
Expecting bearish continuation until the two Fibonacci resistance zones hold.
If you enjoy this idea, don’t forget to LIKE 👍, FOLLOW ✅, SHARE 🙌, and COMMENT ✍! Drop your thoughts and charts below to keep the discussion going. Your support helps keep this content free and reach more people! 🚀

GBPNZD – Bearish Channel Retest Offering Short OpportunitiesHello Trading Fam! 👋
Price is in a clear downtrend within a descending channel, so bias is bearish.
Price has retraced back into a previous support-turned-resistance “structure” zone plus the top of the channel.
That confluence area is where you look for bearish signals (rejection candles, breaks of minor lows) to enter shorts, targeting the lower channel.
Don’t forget to like and share your thoughts in the comments! ❤️

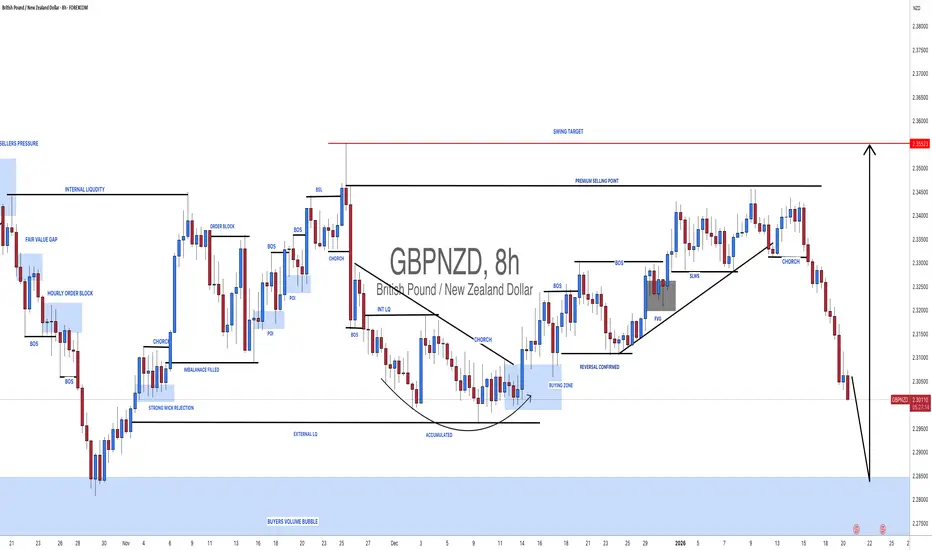
GBPNZD: Bullish Reversal Is Now Inevitable. Big Move In Making! Dear Traders,
The GBPNZD pair is currently in a swing sell. The price has failed to reverse and continue breaking support zones. This presents a great opportunity to swing buy GBPNZD. The price is likely to fall around our buying zone and then reverse nicely towards our take profit. Please manage your risk accurately when trading GBPNZD. Wait for the price to reach our area and then for it to be rejected in a smaller timeframe.
Team Setupsfx_

GBPNZD | Final Rally 2.46+ Before CollapseGBPNZD | The Final Push Before the Crash 🌋 | Wave (5) Climax in Motion!
🔍 Quick Outlook
GBPNZD is unfolding its micro wave (5) of C , the final stretch of the b wave of the Supercycle .
Momentum is fading, Smart Money is positioning, and a major reversal is brewing. ⚡
After a minor correction near 2.25 – 2.21, a last push higher is expected toward 2.46 + , aligning with the 1.618 Fib extension and the buy-side liquidity zone .
Once liquidity is taken, price may enter a multi-year bearish Wave C , targeting 1.70 – 1.62. 📉
🌊 Wave Theory + Confluence
✅ Wave (5) of C active – terminal phase underway
🎯 1.618 Fib extension ≈ 2.46
🕐 Minor wave (4) correction almost done
💥 Expect liquidity sweep above 2.45 – 2.48 then reversal
💰 Smart Money + Structure
🏦 Institutions accumulating below 2.25 before final markup
🎣 Liquidity inducement above 2.45 = trap zone
🔻 BOS below 2.1580 → bearish confirmation
🧩 Rising-wedge structure shows exhaustion
🔄 Market Cycle Perspective
We’re in the Euphoria phase — once wave (5) completes, the Depression phase (Wave C) could unfold toward 1.62 support before a new macro up-cycle begins.
Summary
"GBPNZD is in its final euphoric rally! One last liquidity grab above 2.45 before the big markdown begins. Watch closely 👀"
⚡ If this breakdown helps your outlook — Boost 👍, Comment 💬 & Follow 🔔 for live GBPNZD updates and multi-wave setups!
— Team FIBCOS
Trade the liquidity, not the noise." 💡

GBPNZD Will Fly From SupportHello Traders
In This Chart GBPNZD 4 HOURLY Forex Forecast By FOREX PLANET
today GBPNZD analysis 👆
🟢This Chart includes GBPNZD market update)
🟢What is The Next Opportunity on EURNZD Market
🟢how to Enter to the Valid Entry With Assurance Profit
This CHART is For Trader's that Want to Improve Their Technical Analysis Skills and Their Trading By Understanding How To Analyze The Market Using Multiple Timeframes and Understanding The Bigger Picture on the Charts

GBPNZD Bearish Trend Continuation From Marked ResistancesH4 - Bearish Momentum in play
Two Solid Resistance Levels
Trend continuation very likely after pullback.
👉 If you enjoy this analysis, please Like, Follow, and Support the profile! Your engagement motivates us to share more quality setups.

GBPNZD - Looking To Sell Pullbacks In The Short TermH4 - Strong bearish move.
No opposite signs.
Currently it looks like a pullback is happening.
Expecting bearish continuation until the two strong resistance zones hold.
If you enjoy this idea, don’t forget to LIKE 👍, FOLLOW ✅, SHARE 🙌, and COMMENT ✍! Drop your thoughts and charts below to keep the discussion going. Your support helps keep this content free and reach more people! 🚀

GBPNZD: One Swing Entry With One Swing TargetDear Traders,
I hope you’re doing well. We have a fantastic opportunity coming up where the price could move up in an impulse pattern. This trading setup requires just one entry and one swing target but you might also consider using intraday take profit zones.
Like and comment on this post, also please follow us. This will encourage us to share more trading setups!
Team Setupsfx_
GBP/NZD At Perfect Place For Buy , Ready To Get This 200 Pips ?Here is my Daily GBP/NZD chart, this will be my Second time to enter from this area of support. If u take a closer look u will see how strong and stubborn this support area and it pushes the price very high each time it comes near it, so I will enter a buy trade Now cuz the price give us a very clear and strong bullish Price action and the price respect the support so much on smaller T.F , so we can enter a buy trade now . I will be targeting from 100 to 200 pips in this trade .If we have a daily closure below my support , this idea will not be valid anymore and we will see more movement to downside .
Reasons To Enter :
1- Perfect Breakout .
2- Clear Bullish Price Action .
3- Bigger T.F Giving Good Bullish P.A .
4 - Perfect 4H Closure .
5- The Price Respect The Support Again .

GBPNZD pullback to key higher TF MAsWaiting to see if GBPNZD pulls lower into these 3 higher time frame moving averages. The daily 200SMA, weekly 50SMA and monthly 10EMA have lined up for what could be a glorious long setup. 1H & 4H RSI oversold with the daily nearly in this area as well. Watching closely.

GBP/USD PROFESSIONAL CHART ANALYSIS LONG SETUPPrice previously moved in a descending channel, but momentum has shifted after strong rejection from the lows.
Formation of a higher low near the demand zone suggests trend exhaustion on the downside.
Current price action indicates a potential bullish reversal / corrective rally.
Key Zones
Demand / Buy Zone: 1.3340 – 1.3360
Strong rejection area + previous liquidity sweep
Invalidation (Stop Loss): Below 1.3330
A clean break below this zone cancels bullish bias
First Target: 1.3420
Second Target: 1.3460
Final Target: 1.3475 – 1.3480
Prior structure + channel resistance
Price Action Confirmation
Bullish reaction from demand with long lower wicks → buyers stepping in
Consolidation above demand indicates accumulation
Break and hold above 1.3400 strengthens bullish continuation
Trading Bias
Bias: Bullish (counter-trend correction / early reversal)
Preferred Entry: Buy from demand zone on bullish confirmation
Risk-to-Reward: Strong (clearly defined invalidation)

#GBP/USD Sell Trade Scenario.Here’s an up-to-date GBP/USD Sell trade outlook (technical + fundamental) to help you assess whether positioning for a Downside makes sense right now.
Thank You......

GBPNZD Resistance Ahead!
HI,Traders !
#GBPNZD is going up now
But the pair will soon retest
A horizontal resistance level
Of 2.35043 from where a
Local bearish reaction
Is to be expected !
Comment and subscribe to help us grow !

GBP/NZD Made Clear Reversal Pattern,Short Setup To Get 150 Pips Here is my 4H Chart On GBP/NZD , The price creating a very clear reversal pattern ( Head & Shoulders pattern ) and the price made a very good Bearish price action now ,But until now we have not a clear closure below our neckline to confirm the pattern , so we should wait for clear closure with 4h Candle at least below the neckline to can get a confirmation and enter a sell trade and in this case we can targeting from 100 to 200 pips cuz the high for the pattern not more than 150 pips , and if we have not a closure below the neckline this idea will not be valid anymore .
Reasons To Enter :
1- Perfect Touch For The Area .
2- Clear Bearish Price Action .
3- Bigger T.F Giving Good Bearish P.A .
4- Clear Reversal Pattern .

#GBPNZD:+1000 PIPS Two Take Profit Swing Buy Analysis The price is currently consolidating, indicating no clear move. We’re looking for a safe entry point here. There are two potential targets for setting your take profit. We anticipate a strong price reversal on this pair and significant volume in the coming weeks.
Good luck! Show us some support by liking and commenting on the ideas.
Team Setupsfx_
